Re-flash and Configure Yealink Phone for Zoom
How to re-flash and configure Yealink Phone for Zoom
Re-flashing your Yealink T48S Desk phone
The first step in the re-flashing process is to reset the phone to factory default settings.
Enter Admin Mode
Before editing any advanced settings or making any changes, you must switch the phone to Admin Mode. This will allow you to enter the admin code and make the necessary configuration changes.
Follow these steps to enable Admin Mode:
-
- Tap the Menu button to open the Main Menu.
- Tap UserMode to enter the UserMode menu.
- Tap the dropdown menu on the first row titled "User Type" and select admin.
- Tap the Password field to select it, then enter your phone's admin password - 654321.
- Tap Save to save the password and enter Admin Mode.
Factory Reset
First, let’s reset the phone to factory defaults:
1. From the phone's home screen, tap the Menu button to enter the main menu.
2. Tap Advanced to enter Advanced Settings.
3. When prompted, enter the phone’s admin password and press OK.
4. Tap the down arrow to scroll to the second page of options.
5. Tap Reset to Factory.
Configuring Server Settings
The phone should now be reset to factory default settings. Now we must edit the phone’s settings to point to the Zoom provisioning server.
-
- Click Menu in your Yealink phone > Status
- Write down the IP address
- Download the Yealink firmware here.
- Go to a web browser and enter the IP address. Make sure that you use a browser that's connected to the same network as the phone.
- username / password should be “admin” “admin”
- In web portal there should be an area for settings > upgrade and you’ll see were you can upload a firmware file. Upload the firmware and save.
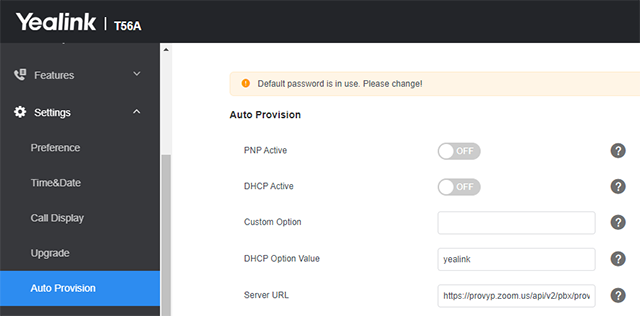
Configuring provisioning server
Note: Older Yealink devices may have a slightly different web interface that has the green header bar.
- Navigate to the Settings > Auto Provision.


- Enter https://provyp.zoom.us/api/v2/pbx/provisioning/Yealink/t48s in the Server URL field.
- Delete any data in the User Name and Password fields.
- Click Confirm to save the configuration then click Auto Provision Now to apply the configuration to your phone. Your phone will reboot several times to complete provisioning.